Stop Wasting Money: Make Your Own Aloe Vera Oil Like a Boss for Epic Hair
Tired of your hair looking like a damn tumbleweed? Yeah, that dry, frizzy mess with zero bounce or shine? You’ve probably blown serious cash on fancy serums and oils that promise the moon but deliver squat. Let’s be real, those store-bought chemical cocktails and heavy silicones? They just build up on your scalp and weigh your hair down, leaving it feeling even worse. That’s why smart folks are ditching the garbage and making their own aloe vera oil — it’s the ultimate natural hack for real hair care. What if I told you this whole thing is way easier than you think, needing just a few bits from your kitchen? Seriously, stick with me. I’m not just gonna drop the step-by-step lowdown, but also a killer customization trick to make your homemade batch perfectly tailored for your hair needs. No more BS, just results.
Why Aloe Vera Oil Is the Undisputed MVP of Natural Hair Care
Listen up, this isn’t some new fad. Aloe vera has been the OG secret weapon in beauty for ages, thanks to its legendary soothing gel. Mix that magic with a good carrier oil, and boom — you’ve got a lightweight, hydrating potion that people are absolutely raving about. This plant ain’t just pretty; it’s loaded with vitamins, enzymes, and amino acids, all working overtime to give you that soft, manageable hair you’ve been dreaming of. But hold up, there’s more. Folks who actually use this stuff swear their hair looks healthier, shinier, and just plain better with regular use of aloe vera-based oils. Sure, everyone’s hair is different, but with this DIY option, you call the shots on every single ingredient. No hidden nasties, just pure goodness.
What the Heck Is Aloe Vera Oil, Anyway?
Alright, let’s cut through the fluff. Aloe vera oil isn’t rocket science. It’s basically a badass infused oil where you gently cook down fresh aloe vera gel with a solid base oil — think coconut oil or olive oil. This slow simmer is key, it lets all those amazing beneficial compounds from the aloe jump ship into the oil, creating a seriously versatile hair elixir. And here’s the kicker: unlike plain aloe gel, which is watery and goes bad faster than a politician’s promise, the oil version lasts way longer and is a breeze to apply. Oh, and that cool green tint you see in the homemade stuff? That’s just the natural good vibes (pigments) from the fresh aloe leaves doing their thing. Pretty neat, huh?
Your Arsenal: What You Really Need for This DIY Aloe Vera Oil Mission
Look, if you want killer results, you gotta start with killer ingredients. No shortcuts, no cheaping out. Here’s your hit list for a basic batch of this liquid gold:
- 1-2 plump, fresh aloe vera leaves. Seriously, go for the juiciest ones you can find — straight from a healthy plant or a legit source. No sad, withered leaves allowed.
- 2 cups of a rock-solid carrier oil. Coconut oil is a classic if you like it solid at room temp, or go for olive oil if you prefer something lighter. Your call.
- Optional power-ups: A few drops of vitamin E oil to keep it fresh longer, or a couple drops of your fave essential oil for that signature scent (like lavender for ultimate chill vibes).
Listen up, this is a pro tip you can’t ignore: Ditch the store-bought junk. Always, and I mean always, go for fresh aloe vera leaves. That’s where the real magic and maximum freshness live. Don’t compromise on this!
Alright, Let’s Get This Done: Your No-Fail Guide to Making Aloe Vera Oil at Home
You ready to roll? This whole operation is gonna take you about 30-45 minutes of actual work, plus some chill time for cooling. No half-assing it — follow these steps precisely if you want the best results.
Step 1: Get Those Aloe Vera Leaves Ready for Action
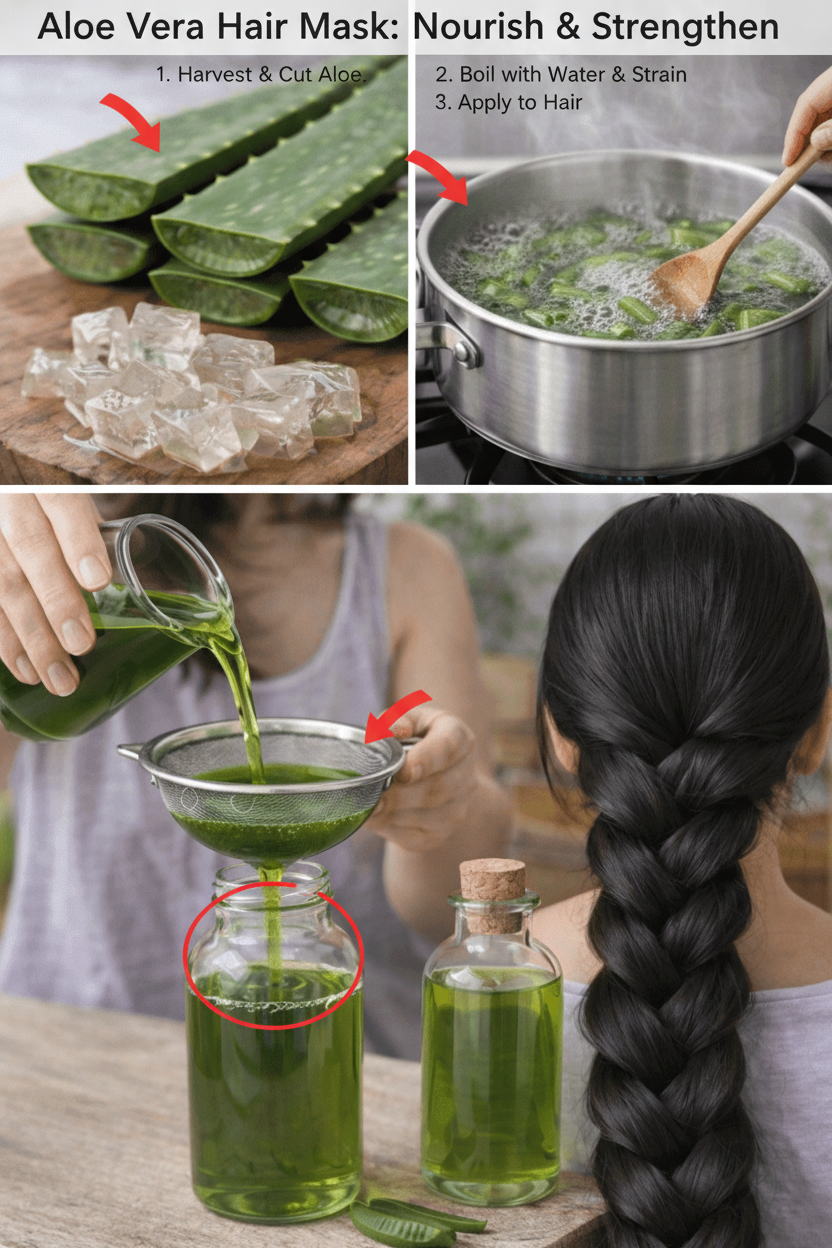
First things first, grab your cleanest scissors and snip off a big, juicy leaf from your aloe plant. Don’t be shy. Give it a good rinse under running water — get all that grime off. Then, pat it bone dry with a clean towel. Now, grab a sharp knife and carefully slice off those spiky edges on both sides. Next, you can either chop the whole leaf into small chunks or, if you’re feeling fancy, scoop out that clear, almost magical gel. See those translucent gel cubes in the pic? That’s your target, buddy. The smaller you chop ’em, the more surface area you create, which means a way better infusion later. Don’t skip this detail!
Step 2: Get That Carrier Oil Warm (But Don’t Burn the House Down)
Alright, now pour your 2 cups of carrier oil into a heavy-duty pan or a double boiler if you’ve got one. Set it on very low heat. I’m talking barely-there warmth here — you want it warm, not smoking, and definitely not bubbling like a witch’s brew. This gentle heat is crucial; it coaxes out all those good properties without frying the delicate compounds. Don’t be impatient, slow and steady wins the race here.
Step 3: Time for the Magic: Infuse That Aloe Vera
Now for the main event: carefully add your chopped aloe vera pieces or gel into that warm oil. Grab a wooden spoon and give it a gentle stir to get everything cozy. Let this concoction simmer on that low heat for a solid 15 to 25 minutes. Don’t freak out if you hear some sizzling — that’s just the water content from the aloe making its grand escape, totally normal, part of the process. Stay vigilant, keep an eye on it, and give it a stir every now and then. You’ll even start to see the oil pick up a subtle green tint as the aloe works its magic and infuses.
Step 4: Let It Cool Down, Then Get Ready to Strain the Gold
Alright, once it’s done simmering, yank that pan off the heat and let the whole damn mixture cool down completely. Seriously, don’t rush this — it’s crucial for your safety and to keep the quality top-notch. When it’s finally cool, grab a fine mesh strainer or some cheesecloth and pour that glorious mixture into a clean glass jar or bottle. Now, press down gently on those aloe solids to squeeze out every last drop of that precious oil. Toss the spent plant bits — they’ve done their job. This straining step? It’s the key to getting that silky-smooth, usable oil that looks just like the fancy stuff in those expensive bottles. Don’t mess it up!
Step 5: Store Your Homemade Oil
And there you have it, folks! You’ve just crafted your very own liquid gold. Now that you’re a certified aloe vera oil pro, why stop here? Dive into more of our killer DIY hair care tips and natural beauty hacks right here on dogpjs.com. Your hair (and your wallet) will thank you! We’re all about giving you the best, most actionable advice to elevate your life. Keep exploring, keep creating!